Guide: New way to skip Microsoft Account login when setting up Windows 11 Setup
TLDR:
- Microsoft strongly encourages using a Microsoft Account when setting up Windows 11.
- Many users prefer a local account for reasons like privacy and easy setup.
- Microsoft display the usual
BypassNRO.cmd, this new simple command lets you bypass the Microsoft Account requirement during installation.
Microsoft Windows 11 brings many new features and a fresh look. However, one aspect of its setup process often causes discussion: the push towards using a Microsoft Account. While these accounts offer cloud integration and syncing features, many users still prefer the traditional local account. Thankfully, a simple trick currently allows users to easily set up Windows 11 with a local account, bypassing the usual requirement. This guide explains how.
Step-by-Step: Skipping Microsoft Account login
This method involves using the command prompt during a specific stage of the Windows 11 installation. Follow these steps carefully:
- Begin Windows 11 Installation: Start the installation process as usual, either from a USB drive or other installation media. Proceed through the initial language, region, and keyboard layout selections.
- Reach the Network Connection Screen: Continue until you reach the screen titled “Let’s connect you to a network.” This is the crucial point. Do not connect to any network yet.
- Open Command Prompt: On this network screen, press the
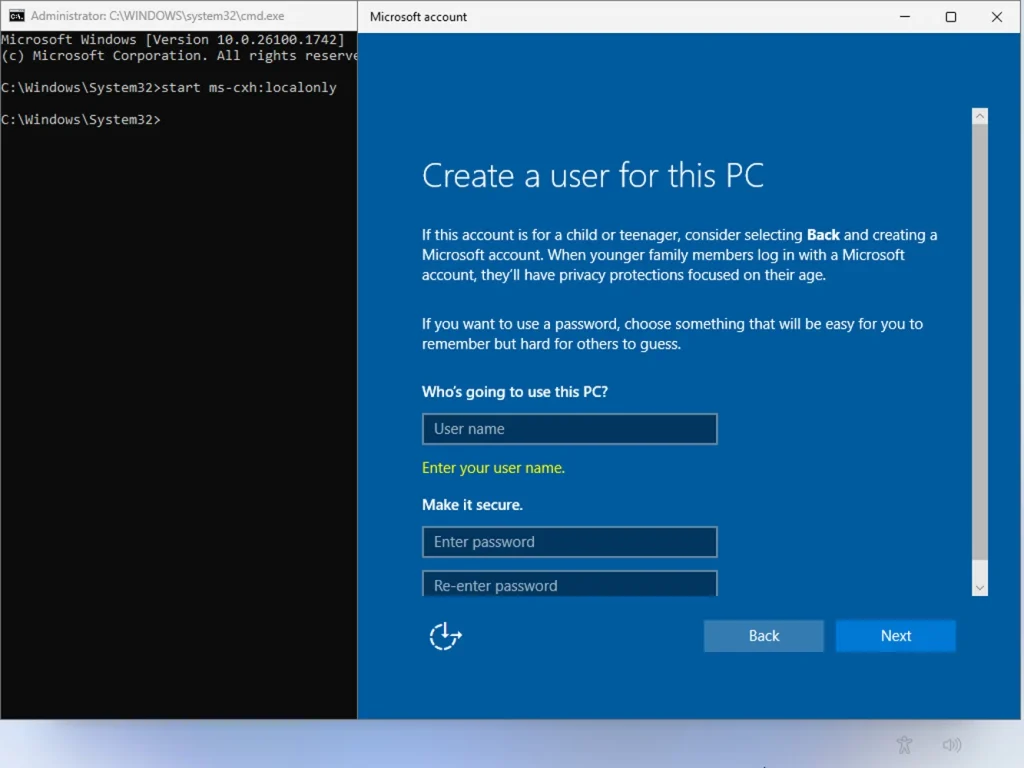
Shift + F10keys on your keyboard simultaneously. This action opens a standard Windows command prompt window overlaying the setup screen. - Enter the Bypass Command: In the command prompt window that appears, carefully type the following command:
start ms-cxh:localonlyPress theEnterkey after typing the command. - Create Your Local Account: Almost immediately, a new window titled “Microsoft account” (ironically) should appear. However, this window is actually the interface for creating a local user account. You will be prompted to enter the desired username for your local account. Enter your preferred name and click “Next.”
- Set Password (Optional but Recommended): You will likely be asked to create a password for your local account. Enter a secure password, confirm it, and click “Next.” Windows 11 setup usually requires setting up security questions as well for password recovery; follow those prompts.
- Continue Setup: After successfully creating the local account name and password (and potentially security questions), the Windows 11 setup process will resume. Crucially, it will now proceed using the local account you just created, completely skipping the screens that push you to sign in with or create a Microsoft Account.
- Complete Installation: Finish the remaining steps of the Windows 11 setup as usual (privacy settings, etc.).
Source: BleepingComputer
Verifying Your Local Account
Once Windows 11 finishes installing and you reach the desktop, you can easily confirm you are using a local account.
Source: BleepingComputer
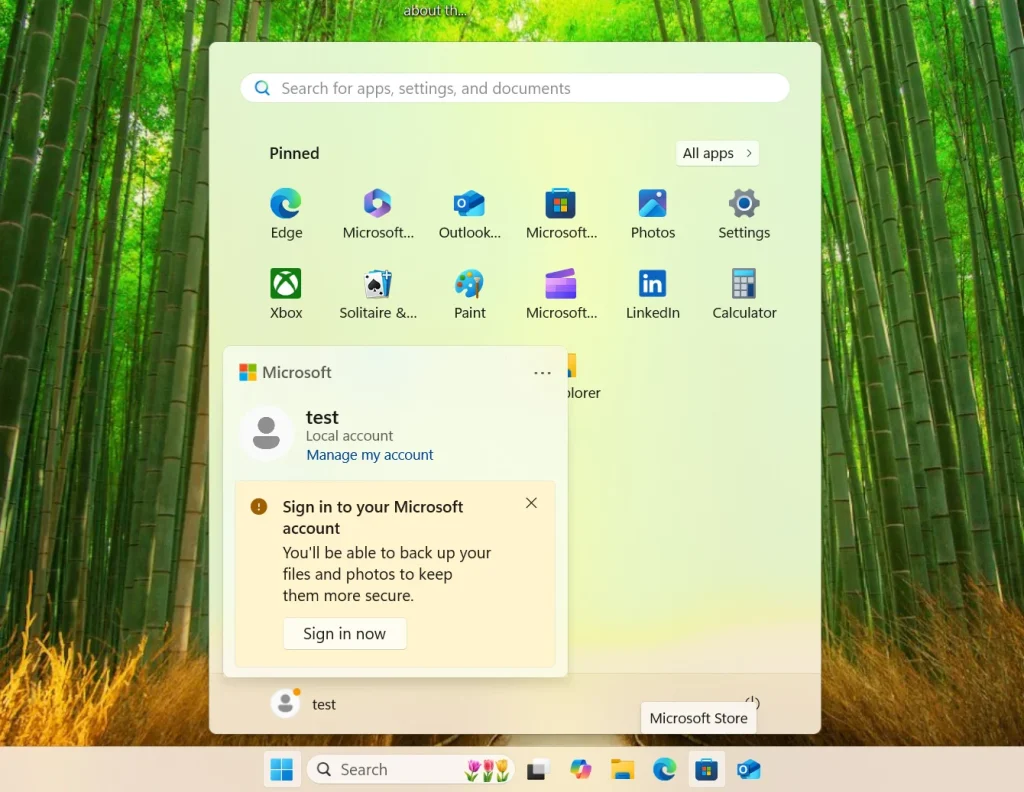
- Click the
Startbutton (usually the Windows icon on the taskbar). - Click on your account name or icon, typically located at the bottom left of the Start menu.
- If you are using a local account, it will usually just display the username you created. If you were using a Microsoft Account, it would typically display your name and the email address associated with it.
Why Some Users Prefer Local Accounts
Before diving into the steps, it helps to understand why someone might choose a local account over a Microsoft Account.
- Privacy Concerns: Local accounts store user information primarily on the device itself. This appeals to users who are cautious about sharing data with Microsoft or storing information in the cloud.
- Simplicity: Some users find local accounts simpler, without the need to remember another online password or deal with potential account recovery issues associated with online accounts.
- Offline Use: A local account does not strictly require an internet connection to log in after setup, which can be useful in specific situations.
- Less Integration: Users who do not heavily rely on Microsoft’s cloud services (like OneDrive or the Microsoft Store for certain apps) may not see the benefit of linking their PC directly to a Microsoft Account.
Microsoft, on the other hand, encourages its online accounts because they integrate tightly with services like OneDrive cloud storage, the Microsoft Store, settings synchronization across multiple devices, and other cloud-based features that define the modern Windows experience.
The Evolving Setup Process
Microsoft has gradually made it more difficult to opt for a local account during the standard Windows 11 setup, especially for the Home edition. Methods that worked previously, like using specific scripts (BypassNRO.cmd), have been phased out or made less accessible in newer preview builds of the operating system. This shows Microsoft’s clear direction towards online account usage.
However, the tech community often finds ways around such restrictions. A new, surprisingly simple command has emerged that makes creating a local account during setup straightforward again.
Will This Method Last?
This start ms-cxh:localonly command provides a significantly easier way to achieve a local account setup compared to previous workarounds. Because this command seems tied more directly into an existing system process (ms-cxh: relates to “Cloud Experience Host”), rather than being a simple script file like BypassNRO.cmd, it might be harder for Microsoft to remove it without affecting other parts of the system.
However, there is no guarantee. Microsoft could potentially disable this command in future Windows 11 updates if they remain committed to prioritizing Microsoft Accounts. For now, it serves as a valuable tool for users preferring local control.
Using this simple command prompt trick during setup ensures users can still easily choose a Windows 11 local account, preserving a level of control and privacy preferred by many.







Thanks for the bypass command! I am helping an elderly person that just bought a cheap Asus budget laptop and no matter how many times I tried, I can’t get shift-F10 to work. No matter if I hold down FN- or not. However, if I press Alt-tab a couple of times I can eventually get to the ‘Run Command’ dialog using Win+R. At this stage Windows is running a restricted mode and I am not even allowed to run CMD from this dialog. But the Bypass command was allowed (for now).
Note: I managed to get to a ‘Command prompt’ before Windows Started using the rescue screen. I added the entry to the Registry there, but this windows does not seem to respect this Registry Key.
This computer came with 24H2 (Home S mode).